If you want to completely understand how to fix leverage browser caching in WordPress, then stick with us till the end because we have a lot to share.
Who doesn’t like to have a blazing fast loading speed?
But somehow you discovered that “leverage browser caching” is stopping your website from loading quickly.
Yet, we are here for that with a solution.
This is the most common error that the majority of people encounter in Google PageSpeed Insights.
And if your goal is to achieve above 90 scores in Google PageSpeed Insights, then you need to get this fixed.
You need to know that Page speed is as important as ever for ranking high on the Google SERPs, as well as providing a GOOD user experience.
This post will tell you what WordPress leverages browser caching, and how to fix leverage browser caching in WordPress.
SO, let’s just dig in.
Table of Contents
Little Info About Leverage Browser Caching WordPress
To put it simply, leverage browser caching speeds up page loading by reducing HTTP requests and improving server response time.
NOW, what do we mean by caching?
The amount of time that browsers store the cacheable resources available on a website locally is referred to as caching.
What is included in that?
This includes images, CSS, JavaScript, and others.
When anyone visits the website, the cacheable resources that have been saved on your device are re-uploaded.
The loading speed of the website is thus improved visibly. This is the reason why people want to use leverage browser caching in WordPress.
What’s a genuine platform that shows actual data and solutions?
You can try out Think with Google to check your site’s status if it loads quickly or it takes a few seconds to load fully.
This tool will give you all the solutions to how you can optimize your website to load it fastly, with a complete report.
Another legitimate tool you can use is PageSpeed Insights by Google to test your website’s page speed.
It will recommend you develop a powerful cache policy to boost page speed.
How to Leverage Browser Caching
If you own or operate a website, you should be informed that server caching refers to the mechanism through which your website produces cached web pages.
This is server-side; browser caching occurs when users access the website via their browser.
This is the exact opposite of the previous statement.
Moreover, when you use browser caching, you’re telling your server how long the resources should be stored in your visitors’ browsers.
In order to take advantage of browser caching, you’ll typically need to identify HTTP headers to specify the correct expiry times for various file types on your website.
If you want to enter the code manually or use a WordPress plugin will depend on whether your web server is Nginx or Apache.
NOW, let’s move on to the methods for leveraging browser caching in WordPress, both with and without a plugin.
How To Fix Leverage Browser Caching On WordPress Without Plugin?
A lot of people don’t prefer a plugin to fix this issue.
You can use browser caching by changing the settings on your web server.
Your web server will then tell the visitor’s browser to save those resources to the browser cache if you do so.
These files will be stored locally by the browser for a set period of time and used for subsequent page visits.
The procedure for instructing your web server to start caching your visitors’ browsers varies from server to server.
Apache and Nginx both are the most popular web servers.
Let’s start to fix leverage browser caching in WordPress on both servers step-by-step.
- WordPress Leverage Browser Caching Using (Apache)
Many shared hosting services use Apache, so if your site has an.htaccess file, you’ll need to follow the Apache code instructions.
Here’s how you can use custom code to take advantage of browser caching on your Apache server.
Once you’ve confirmed that your server is running on Apache, you can move on to the next step.
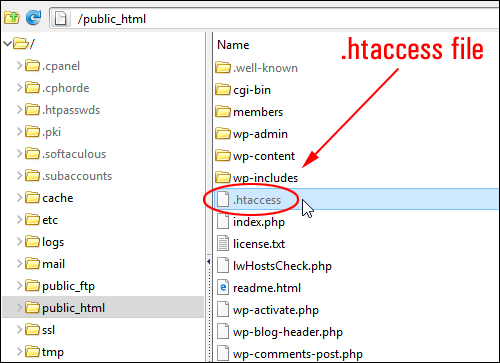
- To gain access to your server, log into CPanel or use an FTP client.
- Find your .htaccess file now.
Because the.htaccess file may be hidden by default, you may need to show hidden files (dotfiles).
Your .htaccess file should look something like below image.
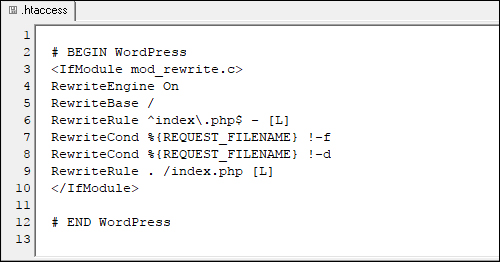
You need to understand that you can either edit it directly on the server or import it and open it in a text editor.
Furthermore, you have many choices for determining browser caching rules like:
Expire headers or Cache-Control headers.
Let’s look at both.
- Cache-control Headers:
You’ll need to add the following snippet of code to the top of your.htaccess file after you’ve opened it:
Copy this code:
# BEGIN Cache-Control Headers
<IfModule mod_expires.c>
  <IfModule mod_headers.c>
    <filesMatch "\.(ico|jpe?g|png|gif|swf)$">
      Header append Cache-Control "public"
    </filesMatch>
    <filesMatch "\.(css)$">
      Header append Cache-Control "public"
    </filesMatch>
    <filesMatch "\.(js)$">
      Header append Cache-Control "private"
    </filesMatch>
    <filesMatch "\.(x?html?|php)$">
      Header append Cache-Control "private, must-revalidate"
    </filesMatch>
  </IfModule>
</IfModule>- Expires Headers:
These Expire headers can be added to the top of your.htaccess file, much like the Cache-Control header.
Look at the code format:
## EXPIRES CACHING ##
<IfModule mod_expires.c>
    ExpiresActive On
    ExpiresByType image/jpg "access 1 year"
    ExpiresByType image/jpeg "access 1 year"
    ExpiresByType image/gif "access 1 year"
    ExpiresByType image/png "access 1 year"
    ExpiresByType text/css "access 1 month"
    ExpiresByType text/html "access 1 month"
    ExpiresByType application/pdf "access 1 month"
    ExpiresByType text/x-javascript "access 1 month"
    ExpiresByType application/x-shockwave-flash "access 1 month"
    ExpiresByType image/x-icon "access 1 year"
    ExpiresDefault "access 1 month"
</IfModule>
## EXPIRES CACHING ##
You can easily review these headers from Chrome’s DevTools once you’ve set them on your server.
Simply go to the network tab, select an asset, and look for the header form you added, such as Cache-Control, Expires, or both.
- Disable Entity Tags:
Last but not least, you must use the following code to deactivate entity tags:
FileETag None
When you disable ETags, the browser can use your cache policy instead of revalidating files every time a page loads.
To make the changes take effect, save the.htaccess file and restart Apache.
- WordPress Leverage Browser Caching Using (Nginx)
Nginx is a free and open-source web server that is used by over 500 million websites.
You have a few options for setting caching expiry times on your website’s static and dynamic components, just as with Apache.
- “Cache-Control” Headers (Nginx)
Within your server block, which is typically located at
/etc/nginx/site-enabled/default,
add this following fragment.
location ~* \.(png|jpg|jpeg|gif)$ {
    expires 365d;
    add_header Cache-Control "public, no-transform";
}

location ~* \.(js|css|pdf|html|swf)$ {
    expires 30d;
    add_header Cache-Control "public, no-transform";
}- “Expires” Headers (Nginx)
Insert the following code into your server block which located at:
/etc/nginx/site-enabled/default/
location ~* \.(jpg|jpeg|gif|png)$ {
    expires 365d;
}

location ~* \.(pdf|css|html|js|swf)$ {
    expires 30d;
}
How To Fix Leverage Browser Caching On WordPress With Plugin?
In case you want to bypass the more involved coding steps, you can use some of the good WordPress plugins to take advantage of browser caching.
WP Fastest Cache is another WordPress caching plugin with easy customization options.
You can allow browser caching in the free edition. As shown above, go to the settings page and check the browser caching checkbox.
LiteSpeed Cache is a caching plugin that enables you to take advantage of browser caching by simply turning it on.
Go to the cache settings after you’ve installed and enabled the plugin. Go to the Browser tab and turn on the Browser Cache function.
You may also specify an expiration date.
This setting, however, will apply to all cached files on your site.