
Do you want to manage your site properly? It’s, therefore, crucial to add Google Search Console to your site on WordPress and equally verify it.
This was formerly known as “Google Webmaster Tools”. It is an effective tool for users ranging from SEOs, bloggers, marketing professionals, designers, and many other internet users. The name has only changed but the application still offers the tools, even with more advanced features.
With the Search Console, users can know how their site visitors view their site, which page has the most views, as well as, if their visitors are viewing their site from a desktop device or mobile device, how the visitors got into the site, and many more. These pieces of information additionally help the user understand how to conveniently use his or her site to help the visitor find more glamour; which in this case, satisfies both the user and the visitor.
It is pertinent to get your site verified if you want to add your site to Google, present sitemaps, and a host of others. And it’s advisable for every site owner to get their site verified. It would save users a whole lot of trouble and would make it easier to promote your site accordingly on the Google Search rank.
Let’s begin with how we can make life easier with the verification for site owners.
Table of Contents
5 reasons why you need to get Google Site Verification
Majorly, site owners whether beginners or long-term owners, do not see the persisting need to get their site verified, especially the ones on WordPress site. It is once again advised and recommended that you get your site verified by the Search Console.
This comes with a lot of great benefits, which is why it is highly recommended for site owners who would yearn for a better searched ranked website or a verified and owned website. These are among the varying benefits.
The reasons why you should get your site verified are;
To build confidence and trust in your visitors. Millions of web pages out there have passed through the website verification channel to get their site verified. Therefore, it is becoming rampant and important as well. So, imagine how your visitors would view your website if it is discovered that it is unverified by Google Search Console. Whereas, verifying your website, would reassure them that they are in a verified and subsequently, a legitimate site. This can consequently be a great turnaround for you and a means to a great end.
To effectively manage your products or goods on your website, and can, therefore, claim ownership in case of any online shoplifting or website theft. This further builds your site’s reputation. This is not limited to products or goods alone but inclusively, website designs, content, and a host of others.
To productively claim your site in case of domain hijacking or domain theft. Since your website is verified, claiming ownership in such a case can be made less challenging. Therefore it serves as a great opportunity for users to claim their website. And this does not just entail their website alone but also the things that encompasses that website.
Do you yearn for a better search rank for your website? Take the first step and get a Google Site Verification. It’s a few-minute task with attainable benefits to attain a better search rank on Google web pages.
To effectively manage the information and conveniently give your users a better experience on your website. This can also be a great way to harness the information into reshaping your site or knowing where you need to work on and so on. This can further help you drive traffic to your website.
Now that we have discussed the various reasons why you need to get your website verified. We can move on to different ways to verify your website. These ways have been broken down and explained to aid your understanding.
So sit back and let’s move on to the main course of action!
9 simplified ways to verify your site by Google Search Console
The importance of verifying your site has been explicitly discussed. However, you might think it is a herculean task verifying your site. We want to reassure you that it is not difficult at all, it is simply strategic, that is, with just some steps you can get your site verified.
There are numerous ways to get your site verified; either manually or through some SEO tools or plugins. You just have to choose the one easy and workable for you, follow the steps appropriately, and verify your site.
To get started on these steps or ways, you need to have a Google Search Console account. You can sign up or log in here. Follow the instructions given, proffer information demanded, open your account, and get started on the following ways to verify your site.
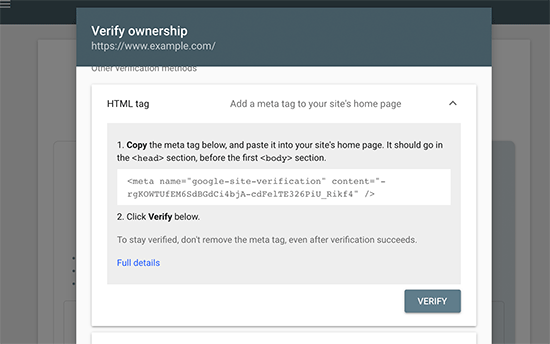
1. HTML Tag Method
This information is in accordance with the WordPress verification format. Therefore this method dictates ways to verify your site on WordPress by Search Console.
Once you have opened your account, it would request for the site’s URL to ensure Property type.
Note, there are distinct methods to verify your site. You can take up the URL prefix verification method or the domain name method. Either way, it is recommended to take up the URL prefix method because of its flexibility and it creates more options for users.

So you need to proffer your WordPress URL prefix details. If you’re not quite sure of it or do not have the information at hand, move into your WordPress admin dashboard, navigate between Settings>General.

You should note there’s a difference between;
https://www.wordpress.com and https://wordpress.com
They are two different entities on Google. So ensure you proffer the right ‘Site Address URL’ or copy and paste it into the property type of the Google Search Console account.
Afterward, select continue and move to verify your website’s ownership.
You can achieve this through different means. Here, we would discuss the HTML tag method.
This is by copying the HTML meta tag code and pasting it on WordPress.
Here, you can make use of any WordPress plugins to link the HTML tag to your WordPress site. But more details on this would be explicitly discussed later in this guide.
You should note however that the archaic style of copying the HTML tag to the heaader.php of the theme on your website is not advisable because in most cases, the HTML tag gets deactivated or does not get connected to your website anymore, upon an update or change operated on your website.
Coupled with this, Google periodically runs a check on websites for the HTML tag, and this could lead to restriction to the site’s data if the tag is not found on your website, and subsequently states that your site is not verified.
2. HTML Verification File
After following the steps enumerated for “HTML Tag Method ” up to the point of confirming ownership; this is where both methods differ.
Successfully verify your site through this method by downloading the Verification file of the HTML and uploading it through a cPanel file software or if you can conductively navigate your way with FTP or SFTP which would permit you to connect the HTML file to the root directory of your site.
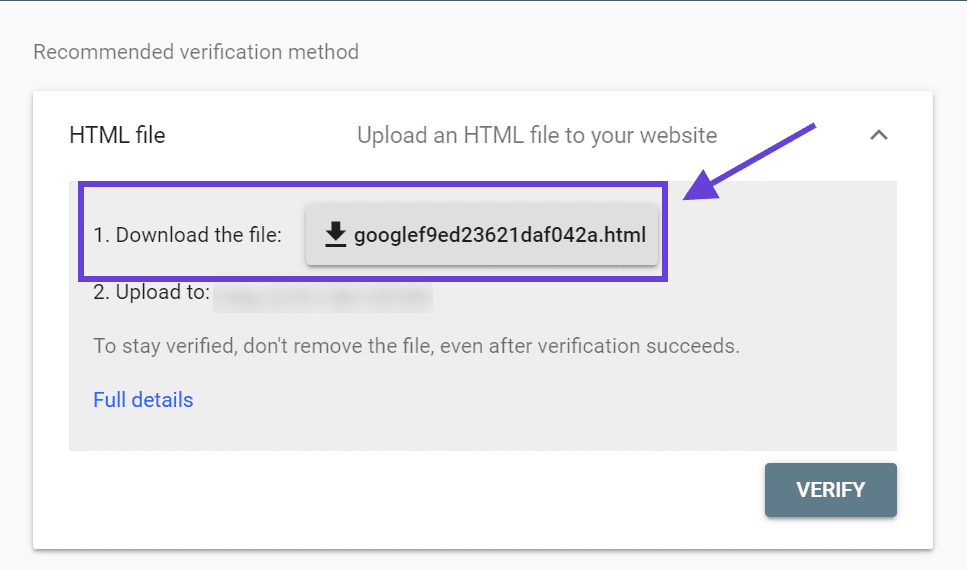
To achieve this, you need to access the HTML File on the Search Console dashboard, this would however be shown after you include your site, it would bring it to your screen as a recommendable method to download in order to give effect to the verification.
Download and upload it to the root directory of your website through either method as discussed above.
Once you’ve accomplished the preceding step, that is uploading the downloaded file to the root folder of your site, revert to the Search Console, and turn your site “Verify”. You would see it if you complete these steps accordingly. The Google Site Verification process would then look for the file in your server, and subsequently verify your site.
3. Verification by DNS
Another great option is verification by the Domain Name Provider. This is a great advantage for website owners with large varsity to claim verification which subsequently covers their main domain, subdomains, as well as other associated domains linked to their website.
Users can verify their site through this method by navigating through the Search Console dashboard > Manage Site. From here you would locate the place to verify the site, click on it, and locate verification by “Domain Name Provider” either under recommendable or alternative methods.
Either way, when you click on it, you should have something like this.

Following the steps, now all you should do is input the DNS TXT record, you can copy and paste it to your site on WordPress.
To do this, locate the DNS record on your site through My sites > Upgrades > Domains > Change Name Server > DNS record.
Once you’ve located it, copy the TXT record to your site and save changes.
Come back to DNS on Google Search Console and “Verify” as stipulated in the image.
Take into account that these methods may vary depending on your Domain Provider. Therefore, you might not have a word-for-word guide for this method.
4. Google Analytics Method
Another impressive option to verify your site by Google is by getting your site connected to Google Analytics.
Google Analytics is a great web analytic tool generated by Google. It bestows users with so many benefits if it is installed on their site.
Moving on, to verify your site through this method, you have to have the asynchronous tracking code already connected to your site. This can be added through a plugin or manually, whichever the user chooses to use. And you also have to make sure that the tracking code is at the “Head” section of your homepage, not the ‘body’.
Once all this has been confirmed, move into the Search Console dashboard, and click on Google Analytics under any method. But you would most probably find it in ‘Other Verification Method’.

And simply “Verify”.
This method is one of the easiest for users. It immediately verifies your WordPress site after following these simple steps.
5. Google Tag Manager
Verification is also attained in the same likeness to Google Analytics. Your site would immediately be verified once you’ve performed all that needs to be done accordingly.
This method has been found to be more complex than Google Analytics because some users do not even have to properly implement it before it functions properly on their site, most especially paid advertisers who utilize Tag Manager widely on a single web property.
All you have to do here is expand the “Google Tag Manager” under “Other Verification Methods”.

And simply “Verify” afterward.
6. SEOPress
This is an easy, efficient, and powerful SEO plugin provided for users to harness for the improvement of their WordPress site. And in addition, it can also be a great implementation tool to get your site verified appropriately.
Here, all you need to do is go into your WordPress dashboard, and navigate through the SEOPress > Advanced > and thereafter, you should be able to locate the Google Search Verification section at the bottom of the page.
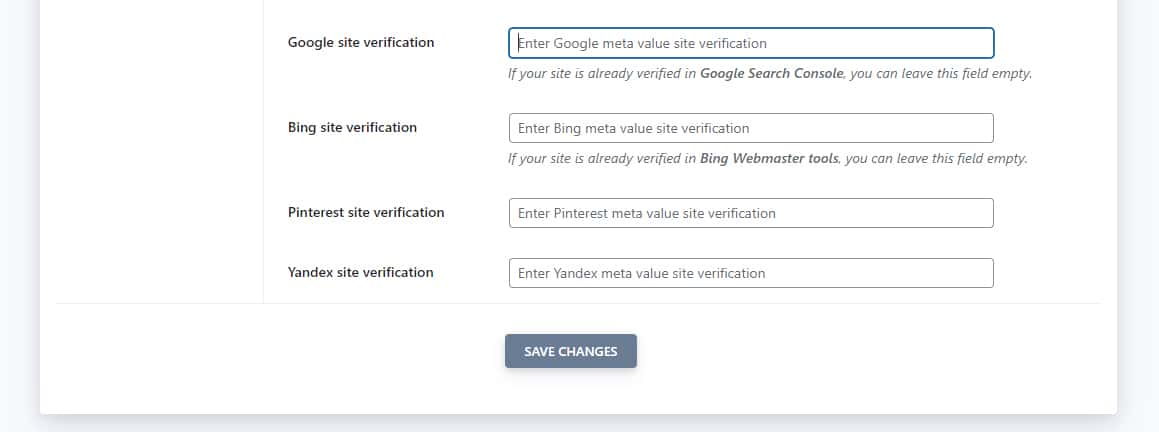
As we have earlier discussed, get your Google Verification code, and enter it into the box as indicated in the “Google Site Verification” box, as provided in the image sample.
Afterward, click on ‘Save Changes’.
You can add any other information if required.
After you’ve saved the changes made, SEOPress would automatically link your pages with the HTML tags.
And finally, verify once completed appropriately.
7. Yoast SEO
Yoast SEO is also an easy way to verify your site on Google Search Console. It’s a popularly known and used plugin for the majority of WordPress users.
To execute this method, you should first attain your Google site’s verification code under ‘HTML tag’. This has been discussed earlier under the HTML tag method.
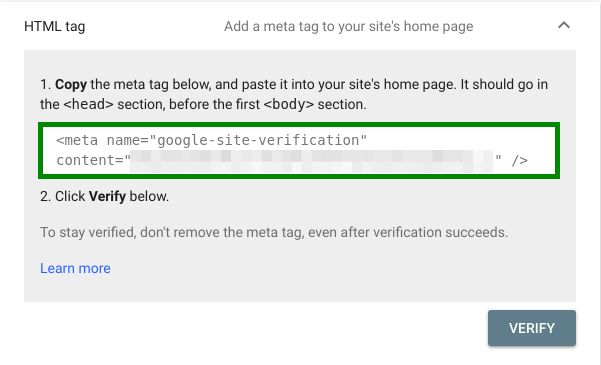
Above all, get the meta tag and move into your WordPress dashboard.
When this is completed, manage your website by navigating through SEO > General. If these steps are properly followed, you should be able to view the Webmaster Tools Section.
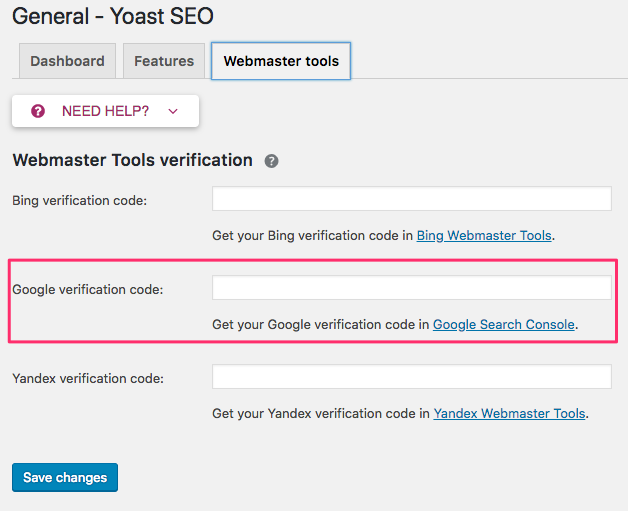
Input the verification code into the highlighted box and save changes.
After you’ve completed this, go back to the Search Console Account and Verify your site.
At this stage, you have successfully connected your WordPress site with Search Console and can now enjoy all the gains that come with it as well.
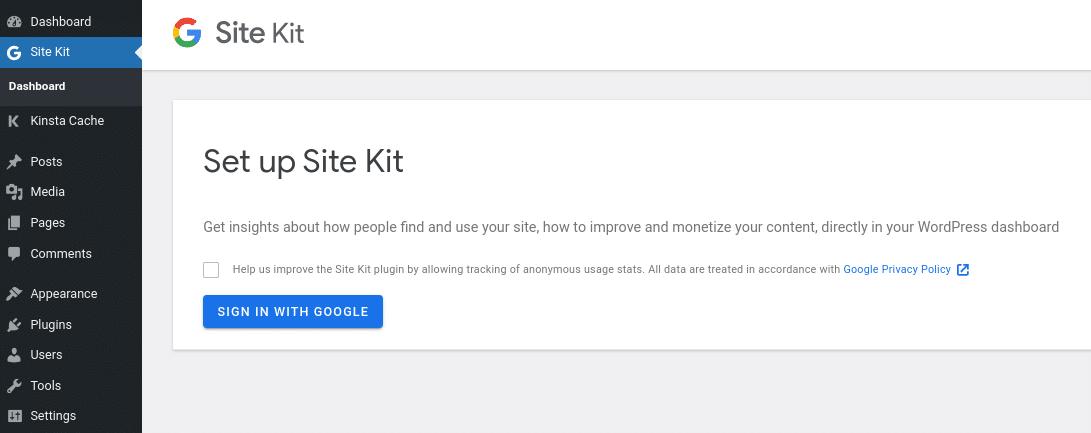
8. Site Kit by Google Plugin
This is an official and free tool powered by Google. And this can also serve as a medium or way to verify your site accordingly with Google Search Console.
First things first, download and install the plugin on your system.
After activation of the plugin, sign in to your Google account. You can select which account to use for the sign-in, this applies to cases whereby users have more than one account.
To achieve the preceding step, navigate through Site Kit and then Dashboard
Reaching this stage, Google would give rise to a connection of your site to Search Console to properly verify ownership.
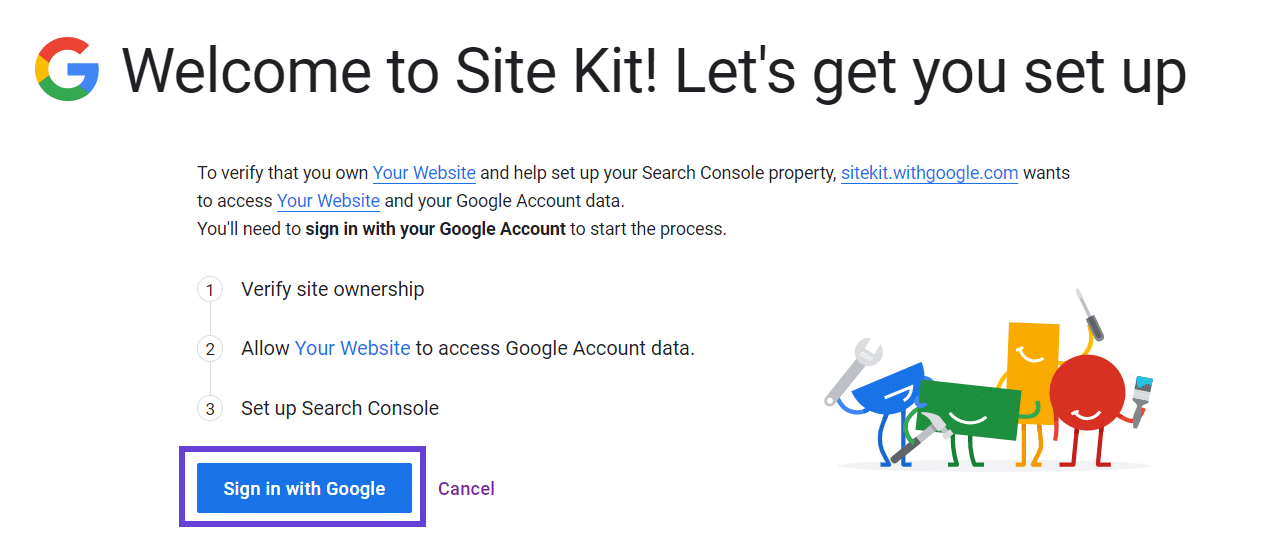
Utilizing Site Kit, however, gives rise to some access to things on your website which Google would inform users before proceeding with the setup.
Click on allow.
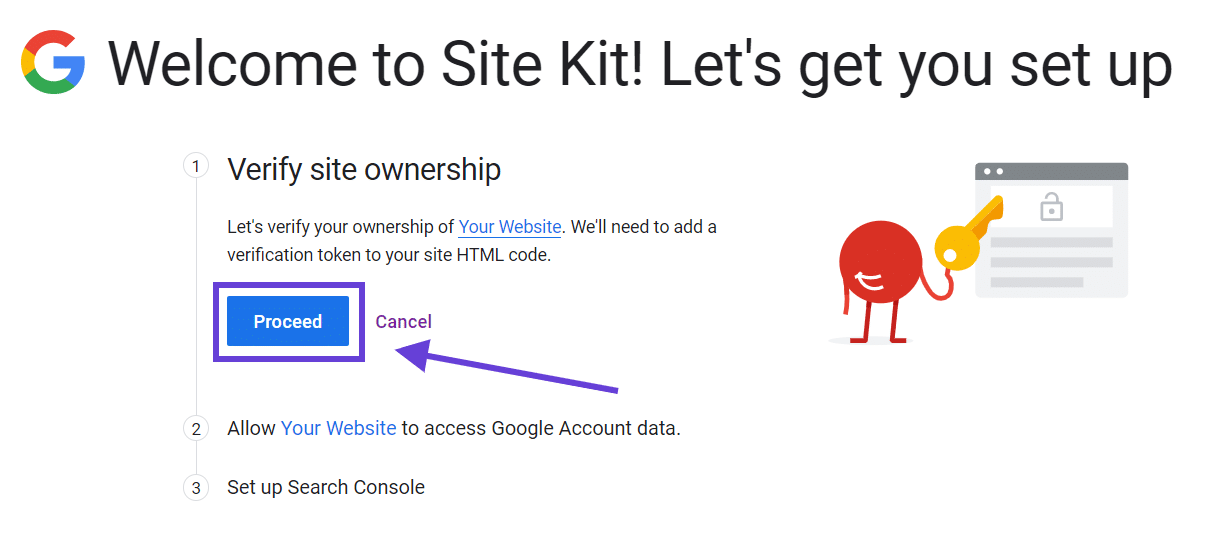
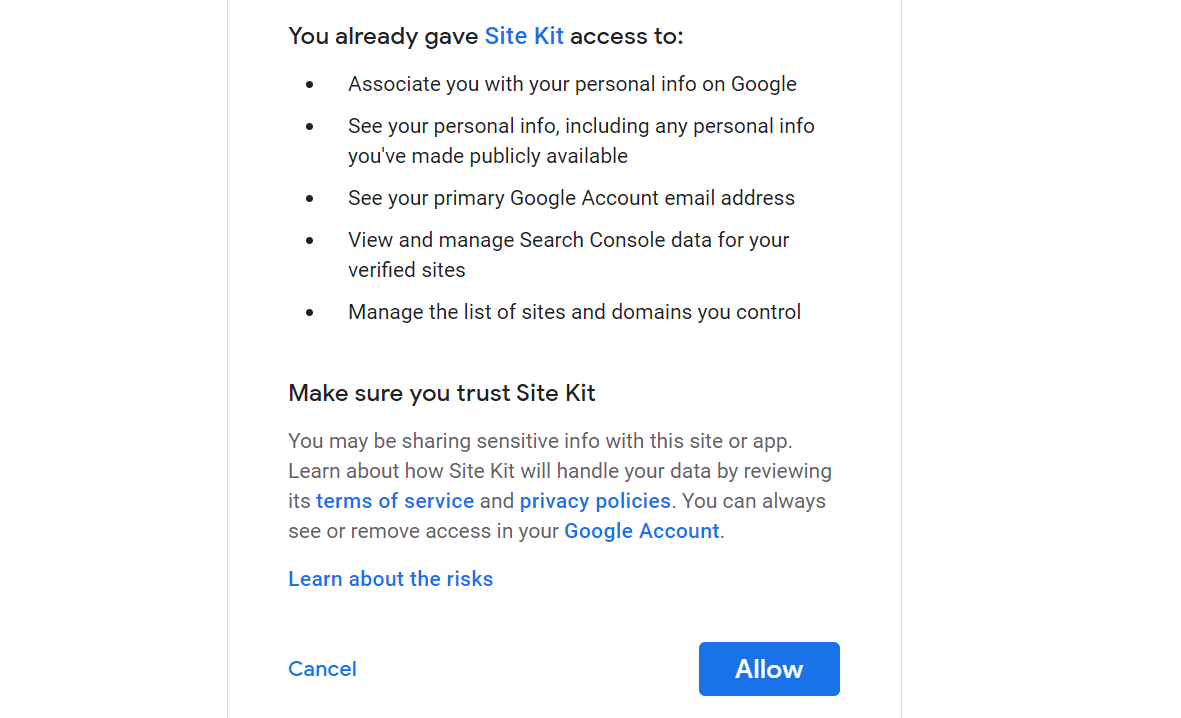
So, it subsequently verifies your website ownership through the site’s HTML code.
Proceeding, it seeks access to some website or account data. All you have to do is allow/proceed.
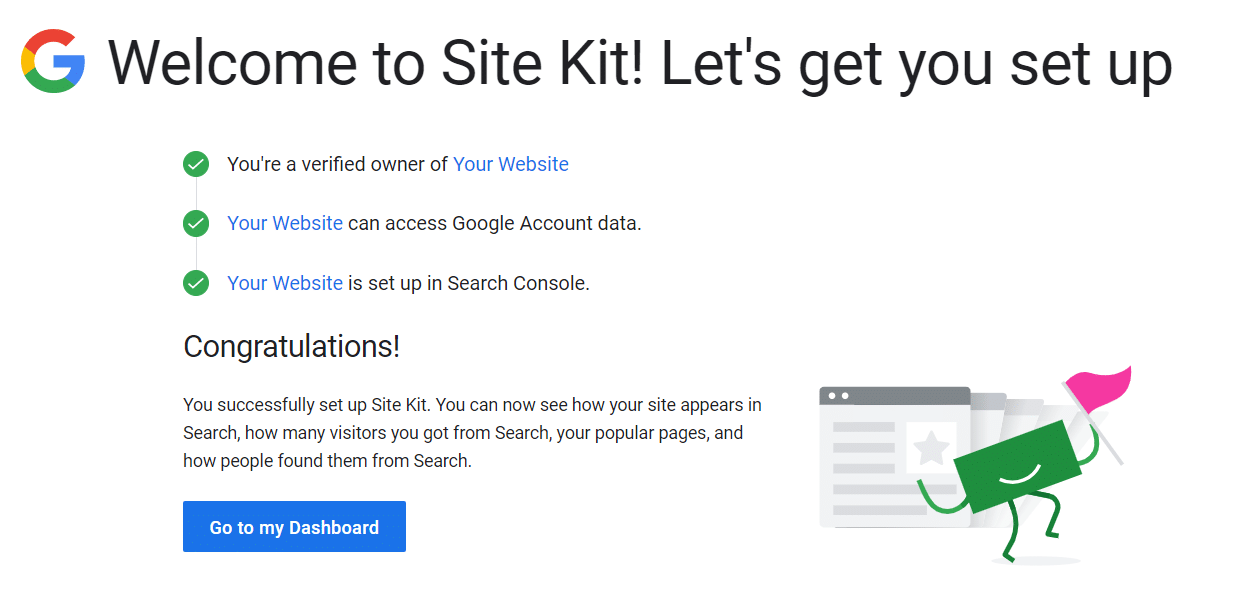
After completing these steps appropriately, you should see this congratulatory message on your screen confirming the verification of your website, and other information would be provided.
These steps are simple to implement. If you do not see the congratulation page, then you must have missed a step or not have followed it appropriately. Either way, you can just go back and repeat these steps.
And if you see the congratulation page, you can move to your WordPress dashboard, you should be able to see the Search Console tab among other tabs. This further aids your confirmation.
9. Rank Math SEO Plugin
Also requires a simple strategy to verify your website using this plugin. This plugin helps create distinct optimization techniques for numerous WordPress sites.
In this case, to use this method, you have to have your Search Console verification code.
After installation and activation of this plugin, you can verify your website by logging into the dashboard and navigating through the General Settings > Webmaster Tools.
At such an instance, you should be able to see the highlighted boxes on your screen.
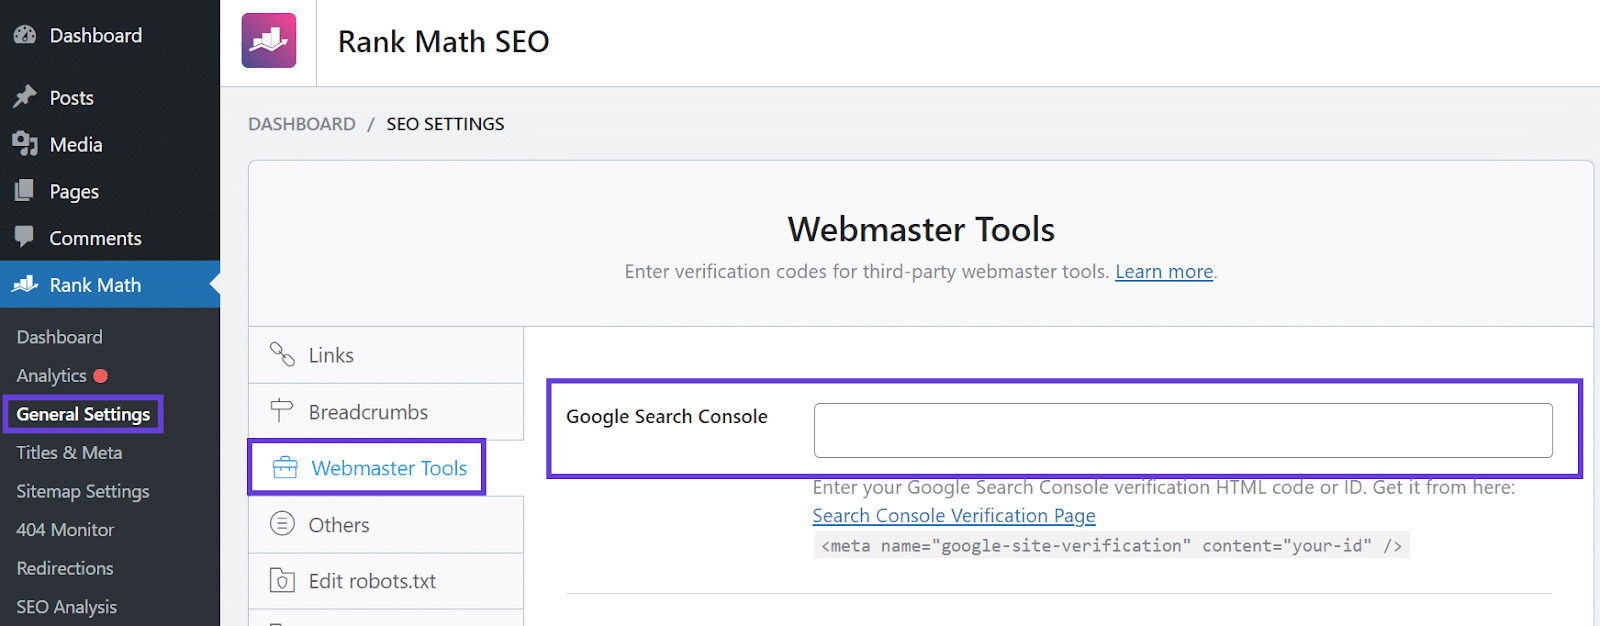
Now, all you have to do is input the verification code into the box provided for it.
And save the modification.
Finally, go back to Search Console and verify your website under ‘HTML tag’.
And done!
Your website is equally verified and verified by Google Search Console.
Conclusion
A detailed guide on ways in which users can utilize appropriately to verify their site right from the comfort of their home. These steps are straightforward and to some extent, easy to implement.
However, you can ponder on which method to use. Here, we are considering using the manual method to verify your site, or to use the easier method- through plugins. You should remember that some of these methods require some items or code or HTML or some sort for its implementation.
Therefore, go over the lesson, and pick that which suits you while also considering your website, convenience, accessibility, and implementation.
Once verified, it can not be changed. Therefore whichever method you decide on, leave it like that because Google conducts a periodic check for Google Site Verification.
Frequently Asked Questions (FAQ)
1. Is Google Analytics and Google Search Console the same?
Although they are both powered by Google and offer immense benefits to users, they’re however not the same. In simpler terms, Google Analytics is a tool that shows the data account on a user’s visitor activities on the user website. This is mostly used for marketing purposes.
Whereas, Search Console depicts information and data on your site’s performance and how it is indexed. Therefore, how search engines see your site.
2. How long does the verification on the site last?
The verification, once done, lasts for as long as Google can confirm the verification because periodic checks are most times operated on the website.
If Google can not confirm the verification, the affected user would be notified and within a specified amount of time, if not fixed, then the verification would expire.
3. Which method is the best for Google Site Verification?
There is no particular method that is the best. It is up to the user to decide on which method can be effectively performed on the WordPress site. And with other things considered, users should be able to take up one of the methods and appropriately apply it on the site.
For more information on this, check Search Console help.
4. Do I need to verify my site as a blogger?
As long as you own a website, this verification is for you. Regardless of whether you’re new or a long-term site owner, a generalist or a specialist, google verification is advantageous to every site owner. So whether you’re a blogger or site administrator or WordPress developer, your site should be equally verified by Google.
5. Does the Search Console keep my data?
Yes. Google Search Console stores users’ data for sixteen months.
6. Does the Search Console help with SEO?
Definitely! That’s the whole point of the data-driven information and statistics. It is automatically designed to help you rank higher for the Search engine results.
7. Is HTML meta tag compulsory for every method of verification?
There are few methods that do not require the HTML tag before the verification can be performed. We have the Google Tag Manager, Google Analytics, Domain Name Provider (DNS).
You can read the article for more information on the process of implementation.